Yashimo will be created in the next couple of days and animated once I get back from Wyoming. The snowmobiling trip should be a nice break from the digital realm.
Sunday, December 28, 2008
Yashimo Set
Here is the Set environment for the SIGGRAPH Student Exhibition Animation Spot. Basically it is just a single show table with an easel. The easel is rigged to perfectly open and close on specific axis and angles from the top of the object. The Robot character known as Yashimo will be able to set up the easel and put his work or the Events banner onto it in one of the 5 second spots.

Yashimo will be created in the next couple of days and animated once I get back from Wyoming. The snowmobiling trip should be a nice break from the digital realm.
Yashimo will be created in the next couple of days and animated once I get back from Wyoming. The snowmobiling trip should be a nice break from the digital realm.
My Flower Girl
I couldn't sleep last night so I started messing with CS4's new navigation capabilities and Adjustment layers. I have been making Leann a Valentines Poster since we have been together. This is #3 Titled : My Flower Girl

This is a very similar style as my previous V-Day poster I gave her. I still want to incorporate a stem with similar style. I love working in primarily simple compositions with alot of contrast. So far, I have only used one image for this peice.

This is a very similar style as my previous V-Day poster I gave her. I still want to incorporate a stem with similar style. I love working in primarily simple compositions with alot of contrast. So far, I have only used one image for this peice.
Wednesday, December 10, 2008
SIGGRAPH Student Exhibition Animation
So, if life didn't offer me any other awesome projects to work on I would have been Happy. But of course, I receive yet another opportunity to stress out about. My SIGGRAPH Organization that I advise in threw an Animation Pitch competition last week during our X-Mas party. Several members pitched awesome ideas with concept art, storyboards, and Animatics... I had forgotten the one and only drawing I had for my pitch at home and had all but decided not to even attempt the pitch.
Of course I was pressured by a few of the officers since I had told them about my ideal a day or so before. So I did the pitch in front of all the student members with absolutely no visuals. Maybe I should be in sales or contract marketing because I won one of the three spots to develop the animation. Good news: it should be pretty awesome, Bad News: It has to be completed in 3 weeks.
Way to go Zeb... Ass. How did I manage to do it? Who knows. But I WILL win the competition.
So Below is the main character. The animation is acting as a video that we can play on our website and around campus to get more students and employers in the various industries to attend. It is between 5 and 10 seconds. I proposed to do (3) 3-5 second animations of a small Martian character (because of its simplicity to model and texture and light) getting ready for an interview.

- One scene he will be arranging his materials for the Student Exhibition and then the logo and event information will fly up and hit the camera.
- Another scene he will be practicing giving a handshake by himself and appear nervous and agitated, one of his resumes will fly off the table and slap the camera with the logo and event information.
The last scene he will be waiting patiently next to his portfolios and works and then beckon the viewer to his area to network. With the Exhibition logo and information slapping the screen at the end.
These (3) spots should be relatively simple, the character and his objects are all easy to model, texture, and light. The camera will be static through all of the shots and the environment will be all white.
The animation will take the longest and the use of sound effects should add a lot to the feeling and comedy of the character's situation as he prepares for the event.
Here is the Student Exhibition logo and Event information Developed by Jason Smith a CGT undergrad.

SIGGRAPH Student Exhibition
April 17th, 2009 5:00p.m.-11:00p.m.
IUPUI Campus Center
Indianapolis, Indiana
If you, your business, or any colleagues would like to attend this free event please contact me by email to register. zwood@iupui.edu Students and Industry professionals can register via the website.
http://siggraph.iupui.edu/
The website may be on and off as we complete some updates...
Thanks for reading and check back soon for progresses on all my projects.
Saturday, December 6, 2008
Muscle Update
Below are my paper notes on more Maya Muscle Tools:
There are many Paint Weight Attributes but there are a few main attributes that control overall movement of the skin geometry reaction to muscle and capsule:
Sticky: Amount 0-1 that controls how much each vertex sticks to the corresponding muscle.
Sliding: Amount 0-1 that controls how much each vertex slides to the corresponding muscles and capsules.
Jiggle: Amount 0-1 that controls how geometric skin is affected by gravity and speed of underlying capsules movement. Feedback only achieved after animation of capsules.
Cycle: Amount 0-1 that acts as a multiplier controlling how fast jiggling starts.
Relax: Amount 0-1 that controls how fast jiggling stops.
Wrinkle:Amount 0-1 that can be painted to encourage vertices to come closer together forming wrinkles.
Self Collisions: 0-1 Amount that helps Maya know where to watch out for geometry hitting itself.
Bone Conversion Issues:
Already mentioned, this toolset can use existing bone tools from Maya to convert existing bone objects into Capsules for muscle use. The process then continues regularly to add muscle objects to the newly converted capsule objects.
A downfall though is that pre-existing bone objects must have correct axis-orientation with one another. This is because when one creates bone chains it is possible to rotate a bone object out of alignment with its parent. Bone axis of rotation is independent of World Space axis.

In Maya, all bone axis at default point the X-axis towards the next child in the bone chain. If this isn’t true when bones are converted into capsules, it will cause random capsule creation and irregular results.

Fortunately this is easily remedied for the artist that is trying to convert Maya Bones into Maya Capsules by re-orienting the Maya bones so that they all follow the same axis of rotation before they are converted to Muscles. To do this Use the Re-Orient Tool in Maya’s Animation Tool.
Other tools of convenience are a Mirror Muscle/Capsule/ and Paint weights tool, which comes in handy for creatures and characters that are symmetrical. The artist can complete one side of the character and simply tell the computer the axis of reflection to mirror data over and apply it completely to the characters opposing half. This will speed up time and creation of rigs exponentially and will prove instrumental in future projects.
Another extremely powerful tool is the ability to attach muscles end affectors to other muscle objects. This allows for muscle stacking. Which in the face is crucial because there are layers of muscle that interact with each other between skin and skull.
All of these tools make for a very high set up time, but more importantly a toolset that is versatile enough to create an anatomically correct muscle driven rig for a human face.
Below is a simple arm rig to test some of the principles.

Sunday, November 23, 2008
Maya Muscle System Basics
Maya’s Muscle Solutions are very versatile and are comprised of three main Components (Figure 4). These components are the CAPSULE, Geometry used as Bone, and Muscles (normally NURBS surfaces). Each of these components can be used separately to deform geometry or in combination with one another.
The Capsule is used to incorporate base level bone type of interaction replaces Maya’s default bone systems. Capsules control simple sliding from the capsules shape translated to the skin geometry by sliding only. Conveniently traditional Maya bone rigs can be converted directly into Capsules which carries over traditional IK/ FK functionality for animation. The use of IK relationships can’t be directly incorporated into Capsule without this conversion. A Displacement distance value known as “Fat” can be adjusted to allow for larger sliding changes to be made from the capsules location.
Geometry used as bone can replace the Capsule by using actual geometry to affect the sliding of skin. This will be of extreme value to an anatomically correct facial rig because there are only two actual moving bones in the face; the skull, and the lower jaw bone. By creating geometry that is dimensionally correct to these bones it will be possible to use geometry as the Bone objects instead of Capsules which cannot take the shape of complex geometry.
Finally the Muscle Object in Maya is extremely powerful and versatile tool that can interact with capsule or bone geometry to perform, sliding, sticking, bulging, and reactions to gravity and motion to achieve highly realistic and predictable movements below the skin geometry. The motion and bulging of muscles is determined by constraining locators at each end of the muscle to positions on Capsules or bone geometry and then morphing the muscle shape between different angles of bone movements. To determine how the skin geometry reacts to the muscle specifically, one can paint vertices to respond to the underlying muscle and bone. Attributes that one can paint into each vertex are jiggle, sliding, sticking, among many others (See Figure 5). With these three components in the Muscle Toolset a fully interacting and complex muscle system can be achieved.
Thankfully the toolset allows for “Smart Collisions” both between Muscles and Capsule/Bones, but also with the Skin and the muscles. This huge because the muscles of the face in particular overlap and intersect each other. So if one to were picture the face below the skin, the layers interacting with each other are Skull and Jaw bone, muscles attached both to the bone and to each other, fat incorporated with the bone and muscle for distance displacement between bone and skin, and then the skin polygonal geometry interacting with everything below it. That interaction is decided by the various attributes which are controlled on a 0 to 1 scale by painting the values directly onto the geometry. All of these relationships then react to the movement of the bones driven by the animator and also the gravity in the scene. Additionally, once the animation has become acceptable and the settings for the geometry reactions are satisfactory, one can “Bake” the vertex movements into a separate .txt file to speed up viewport playback and rendering. Baking references external data to speed up calculations at render and during viewport playback because the software no longer needs to recalculate each vertex position by its painted weights, muscle reaction, or bone driven animation.
All of these tools make for a very high set up time, but more importantly a toolset that is versatile enough to create an anatomically correct muscle driven rig.
Saturday, November 22, 2008
Muscle Research
So back at it again... I have been researching Maya and Max's ability to successfully simulate muscle level of detail with animation. Today we discuss Max's tools.
Angle Deformers:
Used to fix problem areas or enhance deformation by morphing when two bones corresponding angle’s change. Apply this deformer within the Skin modifier and you can morph selected vertices with a simple lattice when the corresponding angles of two bones change value (See Fig 1). This is simple solution to give simplistic muscle deformations. But it is very rigid and does not offer jiggle, response to gravity, or reaction from speed changes in joints.

This Method of using bone angles to morph specific vertices could be very advantageous to cartoony and stylistic characters but can’t be relied on to offer simulations involving gravity, and “jiggle.” In humans, muscle and fat play key roles by sliding and bulging beneath the skin. The Joint Angle Deformer does not offer the ability to slide both beneath the skin and on top of bone like human muscle mass does. (Fig. 2)

To achieve an illusion of this “Sliding” the closest technique available in max to simulate mass reacting to gravity would be the FLEX modifier which controls vertex reactions based on gravity and speed of the vertices affected through the main skin’s animation. One could, in theory, apply an Angle deformer and Flex Modifier to specific vertices that were desired to move like muscle and fat, but this would be an illusion as there would be no actual mass that can be edited visually or react with bones beneath the characters geometric skin. Furthermore, the FLEX modifier offers no way of BAKING information into external files to save memory during viewport playback. The Flex Modifier only works with selected vertices and even better when the vertices are soft selected that way the bounces are applied heavier to some vertices and soften out towards the edges of the selection. To do this one needs to ADD a Edit Poly modifier on top of the Skin modifier that way you can select vertices after they are animated with bones.
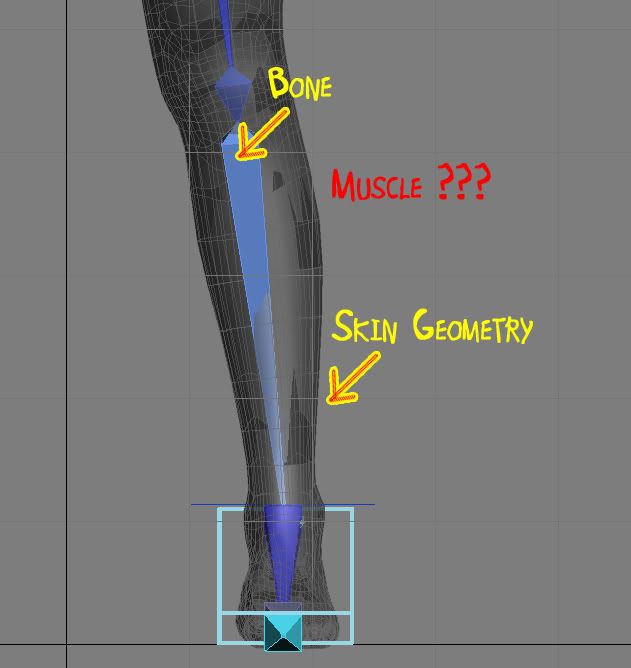
To achieve accurate and easily editable muscle simulations one needs to be able to manipulate 3 types of objects. (1) Bones for animation and rough vertex control of skin. (2) Muscles in the Form of NURBS based geometry to slide on top of bone objects, react to gravity and movement, and to control skin geometry. (3) Skin geometry to both look like human skin and deform to bone and muscle simulations accurately. As of yet 3ds Max can not accurately simulate the interactions between these 3 types of objects nor do they offer comprehensible tools to do so.
Here are some other awesome links I have found that other people are discussing!
http://forums.cgsociety.org/showthread.php?t=304707
I am in contact with this university and they have an awesome face solution based on a huge library of facial animation... But no Muscle implementation....
The Institute of Animation a division of the Filmakademie Baden-Wuerttemburg in Germany is currently working on a project deemed “Dynamic Real-Time Animation” (2006-2010). They have developed a toolset that is available to download for Maya called the Facial Animation Toolset 1.2. The team accepts outside college research in the form of collaborative projects. Their input may be of use. Their tool implements the:
“Adaptable Facial Setup which is capable of driving any humanoid geometry, drawing from an extensive, FACS-based library of facial movement components. The process of fitting the head skeleton to the individual geometry is simplified by offering a standard set of skin weights that accommodates the typical deformation regions of the face. Any skin weights may be cloned topology-independent from one head to another utilizing the Geometry Matching Tool. The Corrective Blendshape Manager offers a useful way to add subtle deformations to a skinned mesh. Blendshape targets can be created and edited, and are computed with respect to the bind pose of the skinned mesh.”
The weakness (and strengths) of their toolset is that the motion is derived independently from a Library of Motion Capture files that are stratified and grouped by the F.A.C.S. which was developed in the late seventies by Friedman whom classified the entire movement capability of the face by muscle. Their goal is to use Motion Capture animation to classify movements based on the F.A.C.S. system first and then mix together each F.A.C.S. animation to achieve a believable face. A rather good ideal but it doesn’t use muscle technologies to achieve gravity and inertia simulation during CG character movements.
Therefore it is still crucial to see if a fully anatomically correct muscle rigged system can be implemented and achieved.
Maya will be next, I can already guarantee I will be using their muscle tools based on Mike Comet's work!!!!
http://www.cometdigital.com/
Angle Deformers:
Used to fix problem areas or enhance deformation by morphing when two bones corresponding angle’s change. Apply this deformer within the Skin modifier and you can morph selected vertices with a simple lattice when the corresponding angles of two bones change value (See Fig 1). This is simple solution to give simplistic muscle deformations. But it is very rigid and does not offer jiggle, response to gravity, or reaction from speed changes in joints.
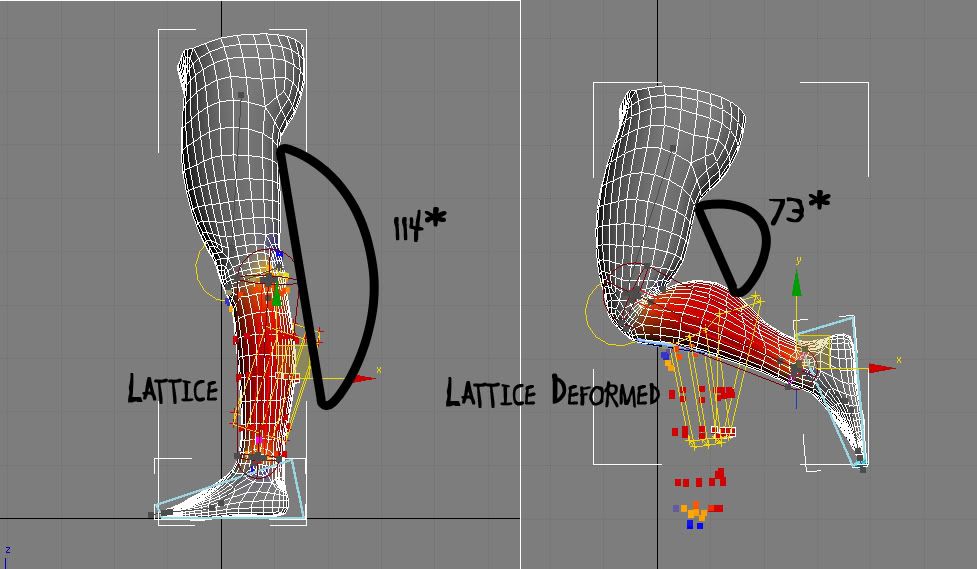
This Method of using bone angles to morph specific vertices could be very advantageous to cartoony and stylistic characters but can’t be relied on to offer simulations involving gravity, and “jiggle.” In humans, muscle and fat play key roles by sliding and bulging beneath the skin. The Joint Angle Deformer does not offer the ability to slide both beneath the skin and on top of bone like human muscle mass does. (Fig. 2)
To achieve an illusion of this “Sliding” the closest technique available in max to simulate mass reacting to gravity would be the FLEX modifier which controls vertex reactions based on gravity and speed of the vertices affected through the main skin’s animation. One could, in theory, apply an Angle deformer and Flex Modifier to specific vertices that were desired to move like muscle and fat, but this would be an illusion as there would be no actual mass that can be edited visually or react with bones beneath the characters geometric skin. Furthermore, the FLEX modifier offers no way of BAKING information into external files to save memory during viewport playback. The Flex Modifier only works with selected vertices and even better when the vertices are soft selected that way the bounces are applied heavier to some vertices and soften out towards the edges of the selection. To do this one needs to ADD a Edit Poly modifier on top of the Skin modifier that way you can select vertices after they are animated with bones.
To achieve accurate and easily editable muscle simulations one needs to be able to manipulate 3 types of objects. (1) Bones for animation and rough vertex control of skin. (2) Muscles in the Form of NURBS based geometry to slide on top of bone objects, react to gravity and movement, and to control skin geometry. (3) Skin geometry to both look like human skin and deform to bone and muscle simulations accurately. As of yet 3ds Max can not accurately simulate the interactions between these 3 types of objects nor do they offer comprehensible tools to do so.
Here are some other awesome links I have found that other people are discussing!
http://forums.cgsociety.org/showthread.php?t=304707
I am in contact with this university and they have an awesome face solution based on a huge library of facial animation... But no Muscle implementation....
The Institute of Animation a division of the Filmakademie Baden-Wuerttemburg in Germany is currently working on a project deemed “Dynamic Real-Time Animation” (2006-2010). They have developed a toolset that is available to download for Maya called the Facial Animation Toolset 1.2. The team accepts outside college research in the form of collaborative projects. Their input may be of use. Their tool implements the:
“Adaptable Facial Setup which is capable of driving any humanoid geometry, drawing from an extensive, FACS-based library of facial movement components. The process of fitting the head skeleton to the individual geometry is simplified by offering a standard set of skin weights that accommodates the typical deformation regions of the face. Any skin weights may be cloned topology-independent from one head to another utilizing the Geometry Matching Tool. The Corrective Blendshape Manager offers a useful way to add subtle deformations to a skinned mesh. Blendshape targets can be created and edited, and are computed with respect to the bind pose of the skinned mesh.”
The weakness (and strengths) of their toolset is that the motion is derived independently from a Library of Motion Capture files that are stratified and grouped by the F.A.C.S. which was developed in the late seventies by Friedman whom classified the entire movement capability of the face by muscle. Their goal is to use Motion Capture animation to classify movements based on the F.A.C.S. system first and then mix together each F.A.C.S. animation to achieve a believable face. A rather good ideal but it doesn’t use muscle technologies to achieve gravity and inertia simulation during CG character movements.
Therefore it is still crucial to see if a fully anatomically correct muscle rigged system can be implemented and achieved.
Maya will be next, I can already guarantee I will be using their muscle tools based on Mike Comet's work!!!!
http://www.cometdigital.com/
Tuesday, November 11, 2008
Comings and Goings
So I am coming up on the end of my Graduate career. Next semester will be a doosy. I am now involved with a team of individuals for a short animation project. I wrote the story and have been named project manager. The project is slated for completion in Spring of 2010 (almost a year after my graduation.)
I will also be designing and completing my Directed project which will be documented in this area as fully as possible. Without getting into to many details I will be creating a anatomically correct human face that (in all hopes) moves correctly as well displaying emotion, phonemes, and will cause reaction from an audience. It will be driven by CG muscles. It will not have any motion capture like many facial movement solutions these days.
I am currently experimenting with toolsets from many softwares but have already started leaning towards Maya 2008 + because of its specified tools. Autodesk Max is my #1 software but I am comfortable elsewhere as well.
I will post some tests with old geometry and simple tests as well very soon.
Until then, get your nose in a book.
Subscribe to:
Posts (Atom)


